2: Installing Infinity Tools
Welcome back! In Chapter 1, you set up your Linux server. Now we'll connect to it and install Infinity Tools. Don't worry - we'll walk through every step together!
What We'll Do in This Chapter
By the end of this chapter, you will:
- ✅ Know how to connect to your server from your computer
- ✅ Have Infinity Tools downloaded and installed on your server
- ✅ Be able to run Infinity Tools for the first time
Time needed: About 15-20 minutes
What is SSH? (Simple Explanation)
SSH stands for "Secure Shell" - but you don't need to remember that! Think of SSH as a secure tunnel that connects your computer to your server. It's like having a remote control for your server that you can use from your regular computer.
Why we need it: Since your server is "in the cloud" (not physically in front of you), we need a way to control it. SSH is that way - it's safe, secure, and the standard way to manage servers.
Don't worry! SSH might sound technical, but we'll show you exactly how to use it. It's actually quite simple once you see it in action!
Step 1: Connect to Your Server with SSH
The first thing we need to do is connect to your server. The steps are slightly different depending on whether you use Windows, Mac, or Linux. Choose your computer type below:
For Windows Users
Windows 10 and 11 have SSH built-in (it's a program called "SSH" that comes with Windows). Here's how to use it:
Option A: Using Windows Terminal or Command Prompt
- Open Command Prompt or PowerShell:
- Press the
Windowskey - Type "cmd" or "PowerShell"
- Click on "Command Prompt" or "Windows PowerShell"
- Press the
- Connect to your server:
- Type this command (replace
YOUR_IP_ADDRESSwith your actual server IP):
- Type this command (replace
ssh root@YOUR_IP_ADDRESSFor Hetzner: root stays root (Hetzner uses root by default)
For DigitalOcean: root stays root (most DigitalOcean images use root)
Example: If your server IP is 123.45.67.89, you would type:
ssh root@123.45.67.89- You'll see a security warning:
- The first time you connect, Windows will ask "Are you sure you want to continue connecting?"
- Type
yesand press Enter - This is normal and safe - it's just Windows double-checking
- Enter your password:
- For Hetzner: If you did not provide an SSH key (we did not cover that here), Hetzner sends you a one time password via email. You will have to change it immediately after your first log-in (Linux will force you to change it).
- For DigitalOcean: Enter the password you created when setting up your droplet
- Important: When you type the password, you won't see any characters appear (not even dots). This is normal for security! Just type and press Enter.
- You're connected!
- If successful, you'll see something like:
root@infinity-tools-server:~# - This means you're now controlling your server!
- If successful, you'll see something like:
Option B: Using PuTTY (Alternative for Windows)
If you prefer a graphical interface, you can use PuTTY:
- Download PuTTY: Go to putty.org and download PuTTY
- Open PuTTY: Double-click the downloaded file
- Enter your server details:
- Host Name: Your server IP address
- Port: 22 (leave as default)
- Connection Type: SSH
- Click "Open"
- Enter your username:
root - Enter your password when prompted
- You're connected!
More Resources for Windows:
For Mac Users
Mac has SSH built-in (it's in the Terminal app). Here's how to use it:
- Open Terminal:
- Press
Command + Space(Command is the ⌘ key) - Type "Terminal"
- Press Enter
- Press
- Connect to your server:
- Type this command (replace
YOUR_IP_ADDRESSwith your actual server IP):
- Type this command (replace
ssh root@YOUR_IP_ADDRESSExample: If your server IP is 123.45.67.89, you would type:
ssh root@123.45.67.89- You'll see a security warning:
- The first time you connect, Mac will ask "Are you sure you want to continue connecting?"
- Type
yesand press Enter
- Enter your password:
- For Hetzner: If you did not provide an SSH key (we did not cover that here), Hetzner sends you a one time password via email. You will have to change it immediately after your first log-in (Linux will force you to change it).
- For DigitalOcean: Enter the password you created when setting up your droplet
- Important: When you type the password, you won't see any characters appear. This is normal! Just type and press Enter.
- For Hetzner: If you did not provide an SSH key (we did not cover that here), Hetzner sends you a one time password via email. You will have to change it immediately after your first log-in (Linux will force you to change it).
- You're connected!
- If successful, you'll see something like:
root@infinity-tools-server:~# - You're now controlling your server!
- If successful, you'll see something like:
More Resources
For Linux Users
Linux has SSH built-in. If you use Linux, you probably already knew that. Here's how to use it:
- Open Terminal:
- Press
Ctrl + Alt + T(on most Linux systems) - Or search for "Terminal" in your applications menu
- Press
- Connect to your server:
- Type this command (replace
YOUR_IP_ADDRESSwith your actual server IP):
- Type this command (replace
ssh root@YOUR_IP_ADDRESSExample: If your server IP is 123.45.67.89, you would type:
ssh root@123.45.67.89- You'll see a security warning:
- The first time you connect, it will ask "Are you sure you want to continue connecting?"
- Type
yesand press Enter
- Enter your password:
- For Hetzner: If you did not provide an SSH key (we did not cover that here), Hetzner sends you a one time password via email. You will have to change it immediately after your first log-in (Linux will force you to change it).
- Important: When you type the password, you won't see any characters appear. This is normal! Just type and press Enter.
- For Hetzner: If you did not provide an SSH key (we did not cover that here), Hetzner sends you a one time password via email. You will have to change it immediately after your first log-in (Linux will force you to change it).
- You're connected!
- If successful, you'll see something like:
root@infinity-tools-server:~# - You're now controlling your server!
- If successful, you'll see something like:
Troubleshooting: Can't Connect?
Common issues and solutions:
- "Connection refused" or "Connection timed out":
- Check that your server is running in your cloud provider's dashboard
- Make sure you're using the correct IP address
- Wait a minute or two after creating the server - it might still be starting up
- "Permission denied":
- Double-check your password (remember, you won't see characters when typing)
- Make sure you're using
rootas the username - For DigitalOcean: Check your email - they send the password there
- "Host key verification failed":
- This happens if you've connected to a different server with the same IP before
- This is usually safe to ignore, but if you're concerned, ask for help
Step 2: Get the Infinity Tools Installer
You'll receive the Infinity Tools installer as a file that you need to transfer to your server. This file is usually named something like infinity-tools-installer.run.
Where to Get the Installer
The installer file will be provided to you through:
- Email attachment - Check your email for the installer file
- Download link - A secure download link will be sent to you
- USB drive - If you received a physical copy
Important: Make sure you have the installer file on your computer before proceeding!
Step 3: Transfer the Installer to Your Server
Now we need to get the installer file from your computer to your server. We'll use an FTP client - a program that helps you transfer files between computers.
What is an FTP Client?
An FTP client is a program that lets you upload files from your computer to your server. Think of it like copying a file from one folder to another, but over the internet.
Why we need it: Your server is in the cloud, so we need a way to send files to it. FTP clients make this easy and secure.
Recommended FTP Clients for Beginners
Here are some beginner-friendly FTP clients. Choose one that works with your computer:
For Windows Users
FileZilla (Recommended - Free)
- ✅ Very easy to use
- ✅ Free to download
- ✅ Works with Windows 10 and 11
- ✅ Has a simple drag-and-drop interface
How to get FileZilla:
- Go to filezilla-project.org
- Click "Download FileZilla Client"
- Download the Windows version
- Install it like any other program
WinSCP (Alternative - Free)
- ✅ Also very easy to use
- ✅ Free to download
- ✅ Good for Windows users
For Mac Users
Cyberduck (Recommended- Free)
- ✅ Very beginner-friendly
- ✅ Free to download
- ✅ Clean, simple interface
FileZilla (Alternative - Free)
- ✅ Works great on Mac
- ✅ Free to download
- ✅ Simple interface
For Linux Users
FileZilla (Recommended - Free)
- ✅ Available for most Linux distributions
- ✅ Free to download
- ✅ Easy to install
How to install FileZilla on Linux:
- Ubuntu/Debian:
sudo apt install filezilla - Fedora:
sudo dnf install filezilla - Arch Linux:
sudo pacman -S filezilla
How to Use Cyberduck (Step-by-Step)
We'll use Cyberduck as an example, but other FTP clients work similarly:
- Open Cyberduck
- Connect to your server:
- Click
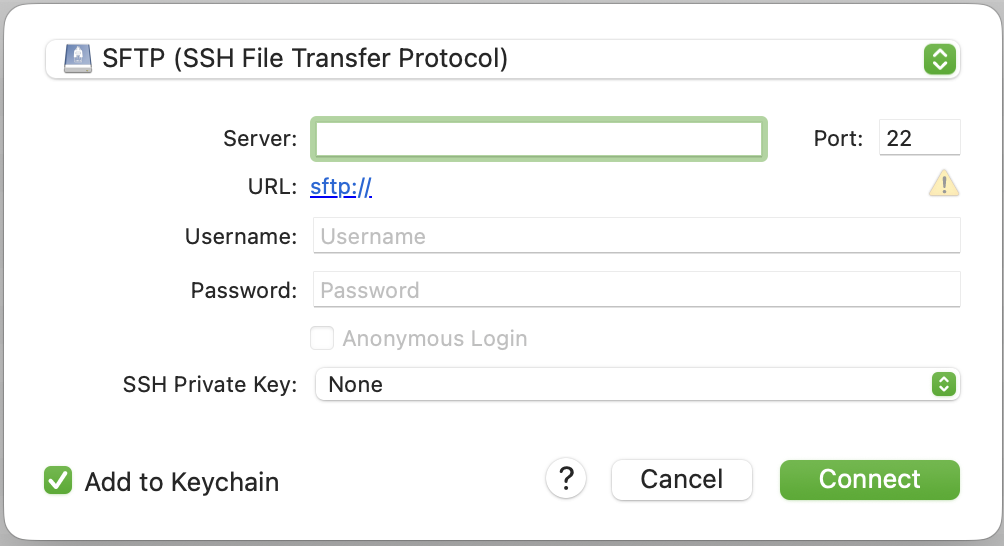
in the toolbar. This dialogue opens:

- Select "SFTP" in the dropdown menu on top
- Server: enter your server's IP address here, something like 192.168.1.0
- Port: this should be automatically set to 22 – that's just how it's supposed to be
- Username: the username you have used for SSH, so root@IP_ADDRESS
- Password: your SSH password
- Connect
- Click
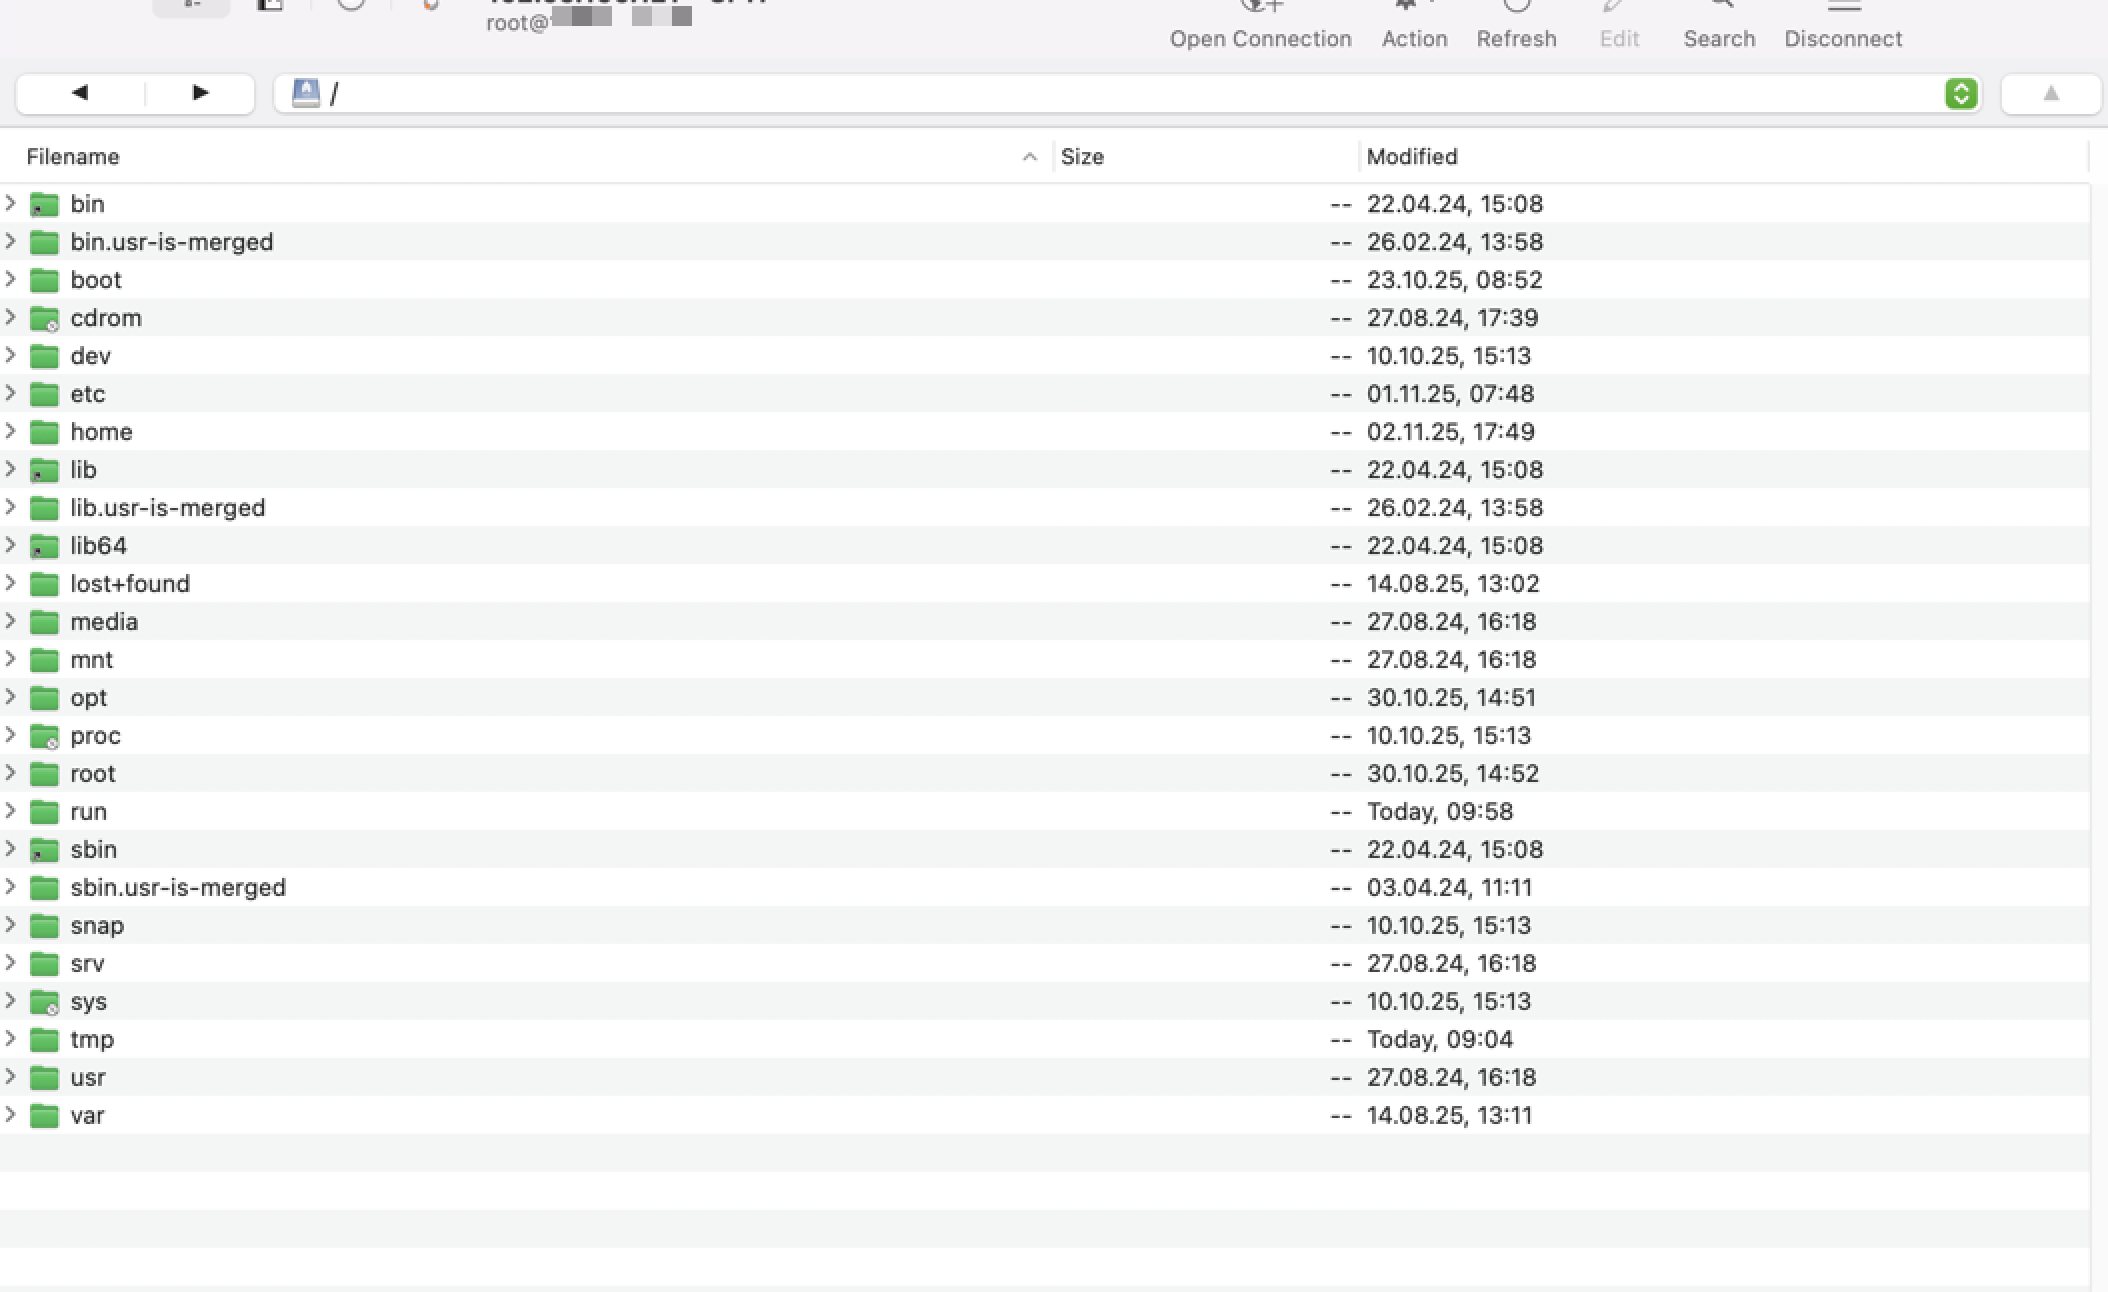
- After connection:
- You should see something like this:
- You should see something like this:
- Navigate to the right folder:
- On the right side (your server), double-click on
/to go to the root folder - Then double-click on
rootto go to your home folder
- On the right side (your server), double-click on
- Upload the installer:
- On the left side (your computer), find the installer file
- Right-click on the installer file
- Select "Upload" or drag it to the right side
- Wait for the upload to complete

Verify the Upload
After uploading, let's make sure the file is on your server. Go back to your SSH connection and type:
ls -lh infinity-tools*.runYou should see the installer file listed. If you see it, you're ready to continue!
Troubleshooting File Transfer
Can't connect to server:
- Double-check your server IP address
- Make sure you're using port 22
- Verify your username is
root - Check that your server is running
Upload fails:
- Make sure you have enough space on your server
- Check that you have permission to upload files
- Try uploading to a different folder (like
/tmp)
File not found after upload:
- Check that you uploaded to the right folder
- Look for the file in different locations
- Make sure the file name is correct
Step 4: Install Infinity Tools
Now comes the exciting part - installing Infinity Tools! The installer will set everything up for you automatically.
Make the Installer Executable
First, we need to tell Linux that this file can be run (executed). Type this command:
chmod +x infinity-tools*.runWhat this does: Makes the installer file executable (able to run)
Run the Installer
Now let's install Infinity Tools! Type this command:
sudo ./infinity-tools*.runWhat's happening:
sudomeans "run as administrator" - we need special permissions to install software./means "run the file in this directory"infinity-tools*.runmeans "the installer file we just downloaded"
During installation, you'll see:
- A welcome message from Infinity Tools
- Progress information as files are copied
- Dependencies being installed (like "gum" - a menu tool)
- A success message when it's done!
How long does it take? Usually 1-3 minutes, depending on your server's speed.
What Gets Installed
The installer automatically:
- ✅ Copies Infinity Tools to
/opt/InfinityTools/ - ✅ Creates a shortcut command called
infinity-tools - ✅ Sets up all necessary permissions
- ✅ Installs a menu tool (called "gum") for the interactive interface
Success Message
When installation completes, you'll see a message like:
✅ INSTALLATION SUCCESSFUL!

📝 Quick Start:
   • Run: sudo infinity-tools
   • Or:  cd /opt/InfinityTools && sudo bash start-tools.sh
If you see this message, congratulations! Infinity Tools is now installed on your server!
Step 5: Verify Installation
Let's make sure everything installed correctly. Type this command:
which infinity-toolsYou should see: /usr/local/bin/infinity-tools
This confirms the shortcut was created successfully!
Step 6: Run Infinity Tools for the First Time
Now for the moment you've been waiting for - let's start Infinity Tools!
Starting Infinity Tools
Type this command:
sudo infinity-toolsWhat happens:
- Infinity Tools will start loading
- You'll see a message like "🔧 Loading Infinity Tools components..."
- Then the main menu will appear!
What You'll See
When Infinity Tools starts, you'll see a beautiful menu with options like:
- 📱 APPS - SOFTWARE (to install applications)
- 🔐 SECURITY & NETWORKING (security tools)
- 🏗️ INFRASTRUCTURE & CORE SYSTEMS (Docker, etc.)
- 💾 BACKUP MANAGEMENT (backup tools)
- 📊 STATUS & HEALTH (check what's running)
First Steps in Infinity Tools
When you first start Infinity Tools, here's what to do:
- Check System Readiness:
- Infinity Tools might automatically check if your system is ready
- It will tell you if anything needs to be fixed
- Install Docker (if needed):
- Docker is required for most applications
- Go to "🏗️ INFRASTRUCTURE & CORE SYSTEMS" → "Install Docker"
- Follow the prompts - Infinity Tools will handle everything!
- Explore the Menu:
- Take some time to look around
- Don't worry - you can't break anything by just browsing!
- Each section has helpful descriptions
Congratulations! 🎉
You've successfully:
- ✅ Connected to your server via SSH
- ✅ Downloaded Infinity Tools
- ✅ Installed Infinity Tools
- ✅ Started Infinity Tools for the first time
You're now ready to use Infinity Tools!
What's Next?
Now that Infinity Tools is installed and running, you can:
- Install Docker (if not already installed) - Go to Infrastructure menu
- Install your first application - Choose from WordPress, Vaultwarden, Nextcloud, and more!
- Set up security - Configure firewall and security settings
- Configure backups - Set up automatic backups for your data
Quick Reference
Connecting to your server:
ssh root@YOUR_IP_ADDRESSStarting Infinity Tools:
sudo infinity-toolsWhere Infinity Tools is installed:
/opt/InfinityTools/If you need to run it manually:
cd /opt/InfinityTools
sudo bash start-tools.sh
Tips for Success
- Take your time: There's no rush. Explore the menu at your own pace.
- Read the prompts: Infinity Tools will guide you through each step.
- Don't worry about mistakes: Most actions can be undone or redone.
- Keep your server password safe: Write it down in a secure place.
- If something goes wrong: You can always reconnect and try again.
Troubleshooting
I Can't Connect to My Server
- Check that your server is running in your cloud provider's dashboard
- Verify you're using the correct IP address
- Make sure you're using the correct username (usually
root) - Wait a minute or two after creating the server - it might still be starting
The Installer Won't Run
- Make sure you used
sudobefore the command - Check that you ran
chmod +xon the installer file - Verify the file downloaded completely (check file size)
- Make sure you're in the directory where you downloaded the file
Infinity Tools Won't Start
- Make sure you're using
sudobefore the command - Check that installation completed successfully
- Verify with:
ls -la /opt/InfinityTools/(you should see files listed) - Try running manually:
cd /opt/InfinityTools && sudo bash start-tools.sh
I Lost Connection During Installation
- Don't worry! Just reconnect to your server
- Check if installation completed:
ls -la /opt/InfinityTools/ - If files are there, try running:
sudo infinity-tools - If installation didn't complete, just run the installer again
Security Note
Important: Your server is now accessible via SSH. To keep it secure:
- ✅ Always use strong passwords
- ✅ Don't share your server password with anyone
- ✅ Consider setting up SSH keys (more secure than passwords) - we'll cover this in a future chapter
- ✅ Keep your server updated
Infinity Tools can help with security too - check out the Security & Networking section in the menu!
You did it! Infinity Tools is now installed and ready to use. In the next chapters, you'll learn how to install your first applications and configure everything you need.
No comments to display
No comments to display