Installation
This chapter is about getting started, installing Infinity Tools and learning about subdomains.
1: Getting Started
Welcome! This guide is designed for people who have some IT interest but don't work professionally in IT. Whether you're exploring Infinity Tools for personal use or considering it for a small business, this guide will walk you through everything step-by-step in plain language.
What Do I Need to Use Infinity Tools?
To use Infinity Tools, you need a Linux server - that's a computer running Linux that's always connected to the internet. Most people don't have a server at home, so you'll rent one from a cloud provider (like renting a computer in the cloud).
You'll Need:
- ✅ A Linux Server - We'll help you get one from a cloud provider
- ✅ A Credit Card - To pay for the server (usually $5-10/month)
- ✅ Basic Computer Skills - If you can use email and browse the web, you're good!
- ✅ About 30 Minutes - To get everything set up
Don't worry if terms like "Linux" or "server" sound scary - we'll explain everything as we go!
What is a Linux Server?
Think of a server like a computer that runs 24/7 on the internet. Instead of having a screen and keyboard, you control it remotely using your regular computer. The server runs special software (Linux) that's designed to host websites and applications.
Why rent a server?
- It's always on (your home computer isn't)
- It's fast and reliable
- It's cost-effective (much cheaper than buying hardware)
- You can access it from anywhere
Choosing a Cloud Provider
Cloud providers are companies that rent out servers. We'll focus on two beginner-friendly options that are affordable and easy to use.
Option 1: Hetzner Cloud (Recommended)
Why Hetzner:
- ✅ Excellent value for money (~€4-5/month)
- ✅ Simple and straightforward interface
- ✅ Good performance
- ✅ Based in Europe (strong data protection laws)
Perfect for: Beginners who want the best price-performance ratio
What you'll get:
- A virtual server (called a "Cloud Server")
- Full control over your server
- All the tools you need
Option 2: DigitalOcean
Why DigitalOcean:
- ✅ Very beginner-friendly interface
- ✅ Excellent documentation and tutorials
- ✅ Great customer support
- ✅ $6/month starting price
Perfect for: Beginners who want lots of help and tutorials
What you'll get:
- A "Droplet" (their name for a server)
- Web-based dashboard
- Helpful community resources
Other Options
You can also use:
- Linode - Similar to DigitalOcean, good alternative
- Vultr - Competitive pricing, global locations
- AWS Lightsail- Amazon's simple option (can be more complex)
Our recommendation: Start with Hetzner if you want the best price, or DigitalOcean if you want extra hand-holding.
Getting Your First Server
Step 1: Create an Account
- Visit Hetzner Cloud or DigitalOcean
- Click "Sign Up" or "Create Account"
- Enter your email and create a password
- Verify your email address
- Add a payment method (credit card)
Don't worry: You won't be charged until you create a server, and you can stop it anytime.
Step 2: Create Your Server
For Hetzner Cloud:
- Login to your Hetzner Cloud account
- Click "New Project" (if you don't have one)
- Name it something like "My Infinity Tools"
- Click "Add Server"
- Choose Location:
- Pick a location close to you (Germany, Finland, USA, etc.)
- Choose Image:
- Select Ubuntu 22.04 or Ubuntu 24.04 (recommended)
- Don't worry about other options - Ubuntu is perfect for beginners
- Choose Server Type:
- Select CX11 (€4.51/month) - this is enough to start
- This gives you: 1 CPU, 2GB RAM, 20GB storage
- Networking:
- Leave default settings (IPv4 enabled)
- SSH Keys:
- We'll skip this for now (covered in next article)
- Name Your Server:
- Something like "infinity-tools-server"
- Click "Create & Buy Now"
After creation: You'll see your server's IP address (looks like: 123.45.67.89) - write this down!
For DigitalOcean:
- Login to your DigitalOcean account
- Click "Create" → "Droplets"
- Choose Image:
- Select Ubuntu 22.04 LTS or Ubuntu 24.04 LTS
- Choose Plan:
- Select Basic → Regular → $6/month (1GB RAM, 1 CPU)
- Or $12/month (2GB RAM) for better performance
- Choose Datacenter Region:
- Pick a location close to you
- Authentication:
- Choose "Password" for now (we'll set up SSH keys later)
- Create a strong password - save this password!
- Finalize:
- Name your droplet (e.g., "infinity-tools")
- Click "Create Droplet"
After creation: You'll see your server's IP address - write this down!
Step 3: Configure Your Server
Once your server is created, you need to do a few basic setup steps:
Enable Basic Firewall (Important!)
Your server needs basic protection. Here's how (we'll cover connecting to your server properly in the next article, but for now):
For Hetzner:
- Firewall is usually enabled by default, but you can add rules in the Hetzner Cloud console
For DigitalOcean:
- Go to "Networking" → "Firewalls"
- Create a firewall that allows:
- SSH (port 22)
- HTTP (port 80)
- HTTPS (port 443)
- Apply it to your droplet
Why this matters: A firewall protects your server from unwanted access. We'll configure this properly later.
What You'll Need Next
Before you can install Infinity Tools, you'll need:
1. A Domain Name (Optional but Recommended)
What is a domain name? It's like an address for your website (e.g., mywebsite.com).
Why you need it: Infinity Tools can automatically set up secure connections (HTTPS) if you have a domain name. Without one, you can still use it, but browsers will show security warnings.
Where to get one:
- Namecheap - Easy to use, good prices (~$10-15/year)
- Cloudflare - Very affordable (~$9/year), includes free features
- Your cloud provider - Both Hetzner and DigitalOcean sell domains
What to do:
- Buy a domain name (e.g.,
myinfinitytools.com) - Point it to your server's IP address (we'll show you how in the next article)
Don't have a domain? That's okay! You can always add one later or use your server's IP address directly.
2. Basic Information
Server IP Address: You got this when you created your server (looks like: 123.45.67.89)
Server Password (DigitalOcean): The password you created when setting up the droplet
Cloud Provider Account: Keep your login credentials handy
Understanding Server Costs
Monthly Costs:
- Server: €4-6/month (~$5-7) for basic setup
- Domain name: ~$10-15/year (one-time each year)
- Total: ~$6-8/month for your own self-hosted services!
What's Included:
- A great variety of applications (WordPress, password manager, cloud storage, etc.)
- No per-user fees
- No storage limits (within your server's capacity)
- Full control over your data
Compared to SaaS:
- Password manager: $3-5/month per user
- Cloud storage: $5-10/month per user
- Analytics: $100s/month
- Your own server: One price, unlimited everything!
Security Basics
Keep Your Server Safe:
- ✅ Always use strong passwords
- ✅ Keep your server updated
- ✅ Use a firewall (we'll set this up)
- ✅ Don't share your server passwords
- ✅ Enable automatic security updates
Infinity Tools will help with most of this automatically!
You're Ready!
You now have:
- ✅ A cloud account
- ✅ A Linux server running
- ✅ The server's IP address
- ✅ Basic understanding of what you're working with
What's Next?
The next article will cover:
- Connecting to your server using SSH (don't worry, we'll explain this!)
- Getting Infinity Tools onto your server
- Running the installer
- Setting up your first applications
Don't worry if some of this feels new! We'll walk through everything step-by-step, and Infinity Tools will handle most of the technical stuff automatically.
Quick Tips
If you get stuck:
- Both Hetzner and DigitalOcean have excellent documentation
- Take your time - there's no rush
- You can always delete and recreate your server if something goes wrong
Safety first:
Remember:
- Your server is a computer in the cloud - treat it like any important computer
- You can stop your server anytime to avoid charges
- Start small and learn as you go
Next: Connecting to Your Server and Installing Infinity Tools (Article 2)
2: Installing Infinity Tools
Welcome back! In Chapter 1, you set up your Linux server. Now we'll connect to it and install Infinity Tools. Don't worry - we'll walk through every step together!
What We'll Do in This Chapter
By the end of this chapter, you will:
- ✅ Know how to connect to your server from your computer
- ✅ Have Infinity Tools downloaded and installed on your server
- ✅ Be able to run Infinity Tools for the first time
Time needed: About 15-20 minutes
What is SSH? (Simple Explanation)
SSH stands for "Secure Shell" - but you don't need to remember that! Think of SSH as a secure tunnel that connects your computer to your server. It's like having a remote control for your server that you can use from your regular computer.
Why we need it: Since your server is "in the cloud" (not physically in front of you), we need a way to control it. SSH is that way - it's safe, secure, and the standard way to manage servers.
Don't worry! SSH might sound technical, but we'll show you exactly how to use it. It's actually quite simple once you see it in action!
Step 1: Connect to Your Server with SSH
The first thing we need to do is connect to your server. The steps are slightly different depending on whether you use Windows, Mac, or Linux. Choose your computer type below:
For Windows Users
Windows 10 and 11 have SSH built-in (it's a program called "SSH" that comes with Windows). Here's how to use it:
Option A: Using Windows Terminal or Command Prompt
- Open Command Prompt or PowerShell:
- Press the
Windowskey - Type "cmd" or "PowerShell"
- Click on "Command Prompt" or "Windows PowerShell"
- Press the
- Connect to your server:
- Type this command (replace
YOUR_IP_ADDRESSwith your actual server IP):
- Type this command (replace
ssh root@YOUR_IP_ADDRESSFor Hetzner: root stays root (Hetzner uses root by default)
For DigitalOcean: root stays root (most DigitalOcean images use root)
Example: If your server IP is 123.45.67.89, you would type:
ssh root@123.45.67.89- You'll see a security warning:
- The first time you connect, Windows will ask "Are you sure you want to continue connecting?"
- Type
yesand press Enter - This is normal and safe - it's just Windows double-checking
- Enter your password:
- For Hetzner: If you did not provide an SSH key (we did not cover that here), Hetzner sends you a one time password via email. You will have to change it immediately after your first log-in (Linux will force you to change it).
- For DigitalOcean: Enter the password you created when setting up your droplet
- Important: When you type the password, you won't see any characters appear (not even dots). This is normal for security! Just type and press Enter.
- You're connected!
- If successful, you'll see something like:
root@infinity-tools-server:~# - This means you're now controlling your server!
- If successful, you'll see something like:
Option B: Using PuTTY (Alternative for Windows)
If you prefer a graphical interface, you can use PuTTY:
- Download PuTTY: Go to putty.org and download PuTTY
- Open PuTTY: Double-click the downloaded file
- Enter your server details:
- Host Name: Your server IP address
- Port: 22 (leave as default)
- Connection Type: SSH
- Click "Open"
- Enter your username:
root - Enter your password when prompted
- You're connected!
More Resources for Windows:
For Mac Users
Mac has SSH built-in (it's in the Terminal app). Here's how to use it:
- Open Terminal:
- Press
Command + Space(Command is the ⌘ key) - Type "Terminal"
- Press Enter
- Press
- Connect to your server:
- Type this command (replace
YOUR_IP_ADDRESSwith your actual server IP):
- Type this command (replace
ssh root@YOUR_IP_ADDRESSExample: If your server IP is 123.45.67.89, you would type:
ssh root@123.45.67.89- You'll see a security warning:
- The first time you connect, Mac will ask "Are you sure you want to continue connecting?"
- Type
yesand press Enter
- Enter your password:
- For Hetzner: If you did not provide an SSH key (we did not cover that here), Hetzner sends you a one time password via email. You will have to change it immediately after your first log-in (Linux will force you to change it).
- For DigitalOcean: Enter the password you created when setting up your droplet
- Important: When you type the password, you won't see any characters appear. This is normal! Just type and press Enter.
- For Hetzner: If you did not provide an SSH key (we did not cover that here), Hetzner sends you a one time password via email. You will have to change it immediately after your first log-in (Linux will force you to change it).
- You're connected!
- If successful, you'll see something like:
root@infinity-tools-server:~# - You're now controlling your server!
- If successful, you'll see something like:
More Resources
For Linux Users
Linux has SSH built-in. If you use Linux, you probably already knew that. Here's how to use it:
- Open Terminal:
- Press
Ctrl + Alt + T(on most Linux systems) - Or search for "Terminal" in your applications menu
- Press
- Connect to your server:
- Type this command (replace
YOUR_IP_ADDRESSwith your actual server IP):
- Type this command (replace
ssh root@YOUR_IP_ADDRESSExample: If your server IP is 123.45.67.89, you would type:
ssh root@123.45.67.89- You'll see a security warning:
- The first time you connect, it will ask "Are you sure you want to continue connecting?"
- Type
yesand press Enter
- Enter your password:
- For Hetzner: If you did not provide an SSH key (we did not cover that here), Hetzner sends you a one time password via email. You will have to change it immediately after your first log-in (Linux will force you to change it).
- Important: When you type the password, you won't see any characters appear. This is normal! Just type and press Enter.
- For Hetzner: If you did not provide an SSH key (we did not cover that here), Hetzner sends you a one time password via email. You will have to change it immediately after your first log-in (Linux will force you to change it).
- You're connected!
- If successful, you'll see something like:
root@infinity-tools-server:~# - You're now controlling your server!
- If successful, you'll see something like:
Troubleshooting: Can't Connect?
Common issues and solutions:
- "Connection refused" or "Connection timed out":
- Check that your server is running in your cloud provider's dashboard
- Make sure you're using the correct IP address
- Wait a minute or two after creating the server - it might still be starting up
- "Permission denied":
- Double-check your password (remember, you won't see characters when typing)
- Make sure you're using
rootas the username - For DigitalOcean: Check your email - they send the password there
- "Host key verification failed":
- This happens if you've connected to a different server with the same IP before
- This is usually safe to ignore, but if you're concerned, ask for help
Step 2: Get the Infinity Tools Installer
You'll receive the Infinity Tools installer as a file that you need to transfer to your server. This file is usually named something like infinity-tools-installer.run.
Where to Get the Installer
The installer file will be provided to you through:
- Email attachment - Check your email for the installer file
- Download link - A secure download link will be sent to you
- USB drive - If you received a physical copy
Important: Make sure you have the installer file on your computer before proceeding!
Step 3: Transfer the Installer to Your Server
Now we need to get the installer file from your computer to your server. We'll use an FTP client - a program that helps you transfer files between computers.
What is an FTP Client?
An FTP client is a program that lets you upload files from your computer to your server. Think of it like copying a file from one folder to another, but over the internet.
Why we need it: Your server is in the cloud, so we need a way to send files to it. FTP clients make this easy and secure.
Recommended FTP Clients for Beginners
Here are some beginner-friendly FTP clients. Choose one that works with your computer:
For Windows Users
FileZilla (Recommended - Free)
- ✅ Very easy to use
- ✅ Free to download
- ✅ Works with Windows 10 and 11
- ✅ Has a simple drag-and-drop interface
How to get FileZilla:
- Go to filezilla-project.org
- Click "Download FileZilla Client"
- Download the Windows version
- Install it like any other program
WinSCP (Alternative - Free)
- ✅ Also very easy to use
- ✅ Free to download
- ✅ Good for Windows users
For Mac Users
Cyberduck (Recommended- Free)
- ✅ Very beginner-friendly
- ✅ Free to download
- ✅ Clean, simple interface
FileZilla (Alternative - Free)
- ✅ Works great on Mac
- ✅ Free to download
- ✅ Simple interface
For Linux Users
FileZilla (Recommended - Free)
- ✅ Available for most Linux distributions
- ✅ Free to download
- ✅ Easy to install
How to install FileZilla on Linux:
- Ubuntu/Debian:
sudo apt install filezilla - Fedora:
sudo dnf install filezilla - Arch Linux:
sudo pacman -S filezilla
How to Use Cyberduck (Step-by-Step)
We'll use Cyberduck as an example, but other FTP clients work similarly:
- Open Cyberduck
- Connect to your server:
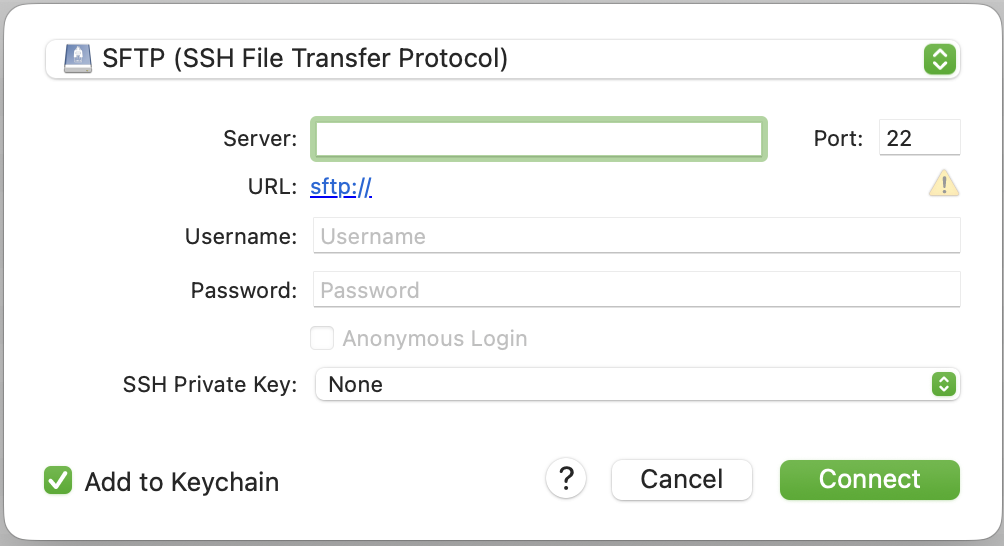
- Click
in the toolbar. This dialogue opens:

- Select "SFTP" in the dropdown menu on top
- Server: enter your server's IP address here, something like 192.168.1.0
- Port: this should be automatically set to 22 – that's just how it's supposed to be
- Username: the username you have used for SSH, so root@IP_ADDRESS
- Password: your SSH password
- Connect
- Click
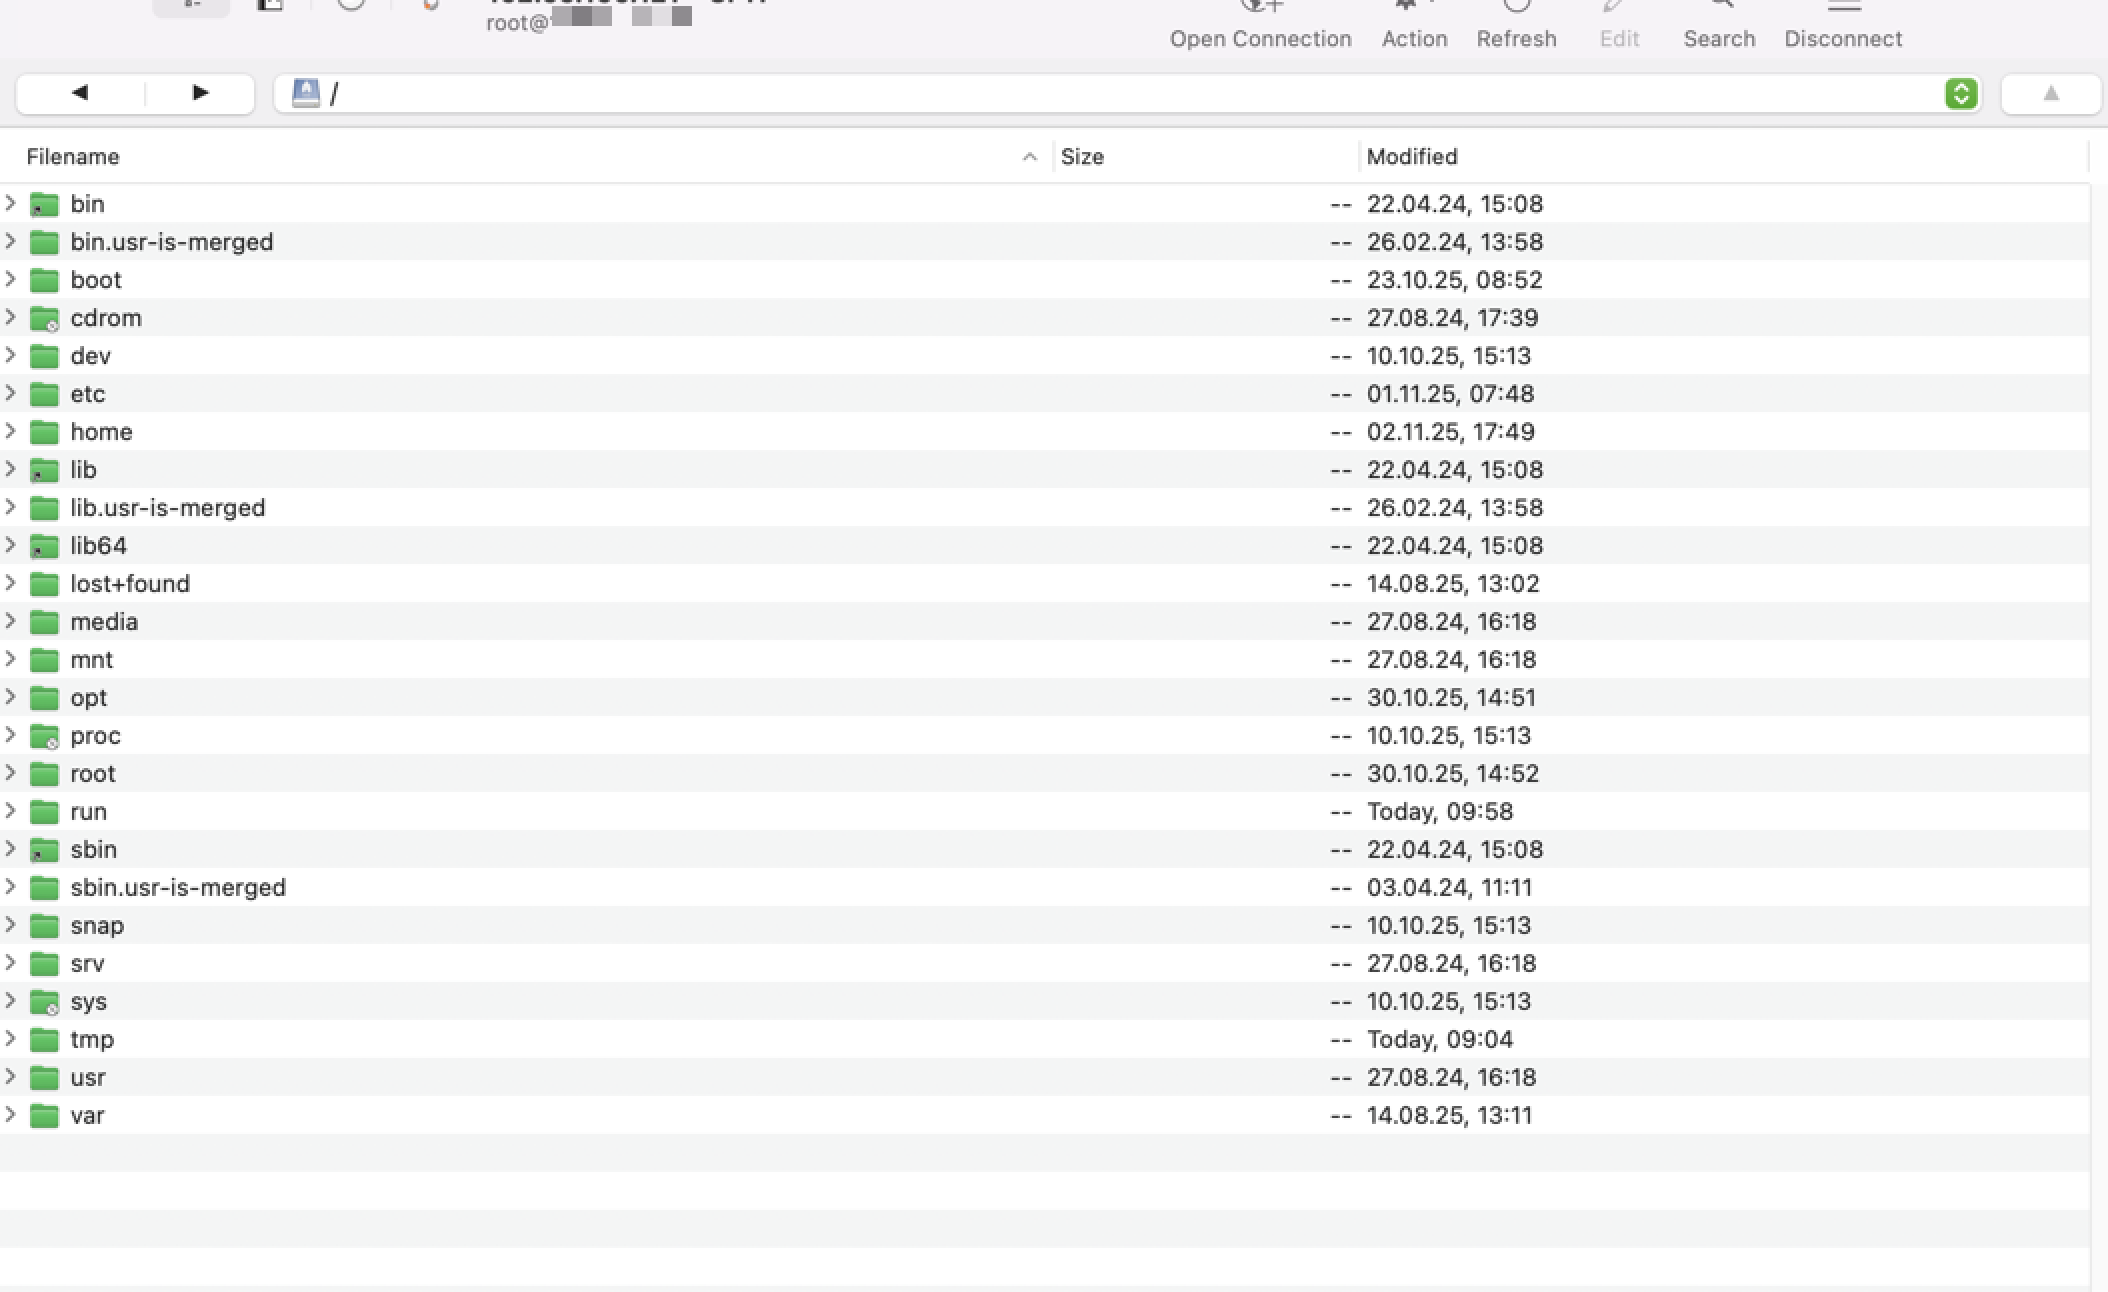
- After connection:
- You should see something like this:

- You should see something like this:
- Navigate to the right folder:
- On the right side (your server), double-click on
/to go to the root folder - Then double-click on
rootto go to your home folder
- On the right side (your server), double-click on
- Upload the installer:
- On the left side (your computer), find the installer file
- Right-click on the installer file
- Select "Upload" or drag it to the right side
- Wait for the upload to complete
Verify the Upload
After uploading, let's make sure the file is on your server. Go back to your SSH connection and type:
ls -lh infinity-tools*.runYou should see the installer file listed. If you see it, you're ready to continue!
Troubleshooting File Transfer
Can't connect to server:
- Double-check your server IP address
- Make sure you're using port 22
- Verify your username is
root - Check that your server is running
Upload fails:
- Make sure you have enough space on your server
- Check that you have permission to upload files
- Try uploading to a different folder (like
/tmp)
File not found after upload:
- Check that you uploaded to the right folder
- Look for the file in different locations
- Make sure the file name is correct
Step 4: Install Infinity Tools
Now comes the exciting part - installing Infinity Tools! The installer will set everything up for you automatically.
Make the Installer Executable
First, we need to tell Linux that this file can be run (executed). Type this command:
chmod +x infinity-tools*.runWhat this does: Makes the installer file executable (able to run)
Run the Installer
Now let's install Infinity Tools! Type this command:
sudo ./infinity-tools*.runWhat's happening:
sudomeans "run as administrator" - we need special permissions to install software./means "run the file in this directory"infinity-tools*.runmeans "the installer file we just downloaded"
During installation, you'll see:
- A welcome message from Infinity Tools
- Progress information as files are copied
- Dependencies being installed (like "gum" - a menu tool)
- A success message when it's done!
How long does it take? Usually 1-3 minutes, depending on your server's speed.
What Gets Installed
The installer automatically:
- ✅ Copies Infinity Tools to
/opt/InfinityTools/ - ✅ Creates a shortcut command called
infinity-tools - ✅ Sets up all necessary permissions
- ✅ Installs a menu tool (called "gum") for the interactive interface
Success Message
When installation completes, you'll see a message like:
✅ INSTALLATION SUCCESSFUL!

📝 Quick Start:
   • Run: sudo infinity-tools
   • Or:  cd /opt/InfinityTools && sudo bash start-tools.sh
If you see this message, congratulations! Infinity Tools is now installed on your server!
Step 5: Verify Installation
Let's make sure everything installed correctly. Type this command:
which infinity-toolsYou should see: /usr/local/bin/infinity-tools
This confirms the shortcut was created successfully!
Step 6: Run Infinity Tools for the First Time
Now for the moment you've been waiting for - let's start Infinity Tools!
Starting Infinity Tools
Type this command:
sudo infinity-toolsWhat happens:
- Infinity Tools will start loading
- You'll see a message like "🔧 Loading Infinity Tools components..."
- Then the main menu will appear!
What You'll See
When Infinity Tools starts, you'll see a beautiful menu with options like:
- 📱 APPS - SOFTWARE (to install applications)
- 🔐 SECURITY & NETWORKING (security tools)
- 🏗️ INFRASTRUCTURE & CORE SYSTEMS (Docker, etc.)
- 💾 BACKUP MANAGEMENT (backup tools)
- 📊 STATUS & HEALTH (check what's running)
First Steps in Infinity Tools
When you first start Infinity Tools, here's what to do:
- Check System Readiness:
- Infinity Tools might automatically check if your system is ready
- It will tell you if anything needs to be fixed
- Install Docker (if needed):
- Docker is required for most applications
- Go to "🏗️ INFRASTRUCTURE & CORE SYSTEMS" → "Install Docker"
- Follow the prompts - Infinity Tools will handle everything!
- Explore the Menu:
- Take some time to look around
- Don't worry - you can't break anything by just browsing!
- Each section has helpful descriptions
Congratulations! 🎉
You've successfully:
- ✅ Connected to your server via SSH
- ✅ Downloaded Infinity Tools
- ✅ Installed Infinity Tools
- ✅ Started Infinity Tools for the first time
You're now ready to use Infinity Tools!
What's Next?
Now that Infinity Tools is installed and running, you can:
- Install Docker (if not already installed) - Go to Infrastructure menu
- Install your first application - Choose from WordPress, Vaultwarden, Nextcloud, and more!
- Set up security - Configure firewall and security settings
- Configure backups - Set up automatic backups for your data
Quick Reference
Connecting to your server:
ssh root@YOUR_IP_ADDRESSStarting Infinity Tools:
sudo infinity-toolsWhere Infinity Tools is installed:
/opt/InfinityTools/If you need to run it manually:
cd /opt/InfinityTools
sudo bash start-tools.sh
Tips for Success
- Take your time: There's no rush. Explore the menu at your own pace.
- Read the prompts: Infinity Tools will guide you through each step.
- Don't worry about mistakes: Most actions can be undone or redone.
- Keep your server password safe: Write it down in a secure place.
- If something goes wrong: You can always reconnect and try again.
Troubleshooting
I Can't Connect to My Server
- Check that your server is running in your cloud provider's dashboard
- Verify you're using the correct IP address
- Make sure you're using the correct username (usually
root) - Wait a minute or two after creating the server - it might still be starting
The Installer Won't Run
- Make sure you used
sudobefore the command - Check that you ran
chmod +xon the installer file - Verify the file downloaded completely (check file size)
- Make sure you're in the directory where you downloaded the file
Infinity Tools Won't Start
- Make sure you're using
sudobefore the command - Check that installation completed successfully
- Verify with:
ls -la /opt/InfinityTools/(you should see files listed) - Try running manually:
cd /opt/InfinityTools && sudo bash start-tools.sh
I Lost Connection During Installation
- Don't worry! Just reconnect to your server
- Check if installation completed:
ls -la /opt/InfinityTools/ - If files are there, try running:
sudo infinity-tools - If installation didn't complete, just run the installer again
Security Note
Important: Your server is now accessible via SSH. To keep it secure:
- ✅ Always use strong passwords
- ✅ Don't share your server password with anyone
- ✅ Consider setting up SSH keys (more secure than passwords) - we'll cover this in a future chapter
- ✅ Keep your server updated
Infinity Tools can help with security too - check out the Security & Networking section in the menu!
You did it! Infinity Tools is now installed and ready to use. In the next chapters, you'll learn how to install your first applications and configure everything you need.
Next: Setting up your Foundation
Excourse: Domains and Subdomains
Infinity Tools helps you self-host everything—including your future WordPress site. Before you install Traefik or any applications, take a moment to decide how your domain should point to your server. In this chapter you'll set up your main domain (even if WordPress isn't running yet) and map out the subdomains each Infinity Tools app will use.
Why this chapter now? Getting DNS ready right after installing Infinity Tools (Chapter 2) means Traefik can issue certificates instantly, your apps come online with friendly URLs, and you won't have to pause mid-install to fix domain problems.
Decide Where Your Main Domain Should Go
Your main domain (also called the apex domain or root domain) is what people type to reach your primary site—for example, myinfinitytools.com. Most beginners following this guide want the main domain to load a WordPress site that they will install with Infinity Tools in Chapter 11.
No WordPress Yet? That's OK.
Even though WordPress isn't installed yet, point your main domain to the server where Infinity Tools runs. Until WordPress is live you'll see Traefik's default page (or a simple placeholder), which is perfectly fine.
You'll create two records now:
@→ your server's public IP address (A record)www→@(CNAME) so both reach the same place
Later, when you install WordPress with Traefik integration, Infinity Tools will automatically use these records to serve your new site over HTTPS.
What is a Subdomain?
A subdomain is like a separate address within your main website. Think of it as different rooms in the same house - each room has its own purpose, but they're all part of the same building.
Examples of subdomains:
vault.myinfinitytools.com- For your password managerfiles.myinfinitytools.com- For your file storageadmin.myinfinitytools.com- For your admin panel
Important Note:
From a security standpoint, it is considered poor practice to use obvious subdomain names (like “admin” or “files”) for sensitive services such as administration panels or data storage. Such names reveal potentially valuable targets to attackers during reconnaissance and were chosen here for illustration purposes.
Breaking Down a Subdomain
Let's look at vault.myinfinitytools.com:
- vault - This is the subdomain (the "room")
- myinfinitytools - This is your domain name (the "house")
- com - This is the top-level domain (the "neighborhood")
Why Do We Need Subdomains?
Subdomains help organize your services and make them easier to access:
- ✅ Easy to remember -
vault.mydomain.comis clear - ✅ Professional looking - Each service has its own address
- ✅ SSL certificates work better - Each subdomain gets its own certificate
- ✅ Easy to manage - You can move services around easily
Without subdomains: You'd have to use ports like mydomain.com:8080 or mydomain.com:3000 - much harder to remember!
Plan Your Subdomains
Start a simple list of the services you plan to run with Infinity Tools. These examples match the chapters you'll follow later. You can always add more subdomains later.
Security Services
vault.mydomain.com- Vaultwarden (Chapter 7)pass.mydomain.com- Passbolt (Chapter 8)vpn.mydomain.com- VPN or remote access gateway
File and Storage Services
files.mydomain.com- Nextcloud (Chapter 10)sync.mydomain.com- Syncthing (Chapter 9)backup.mydomain.com- Borgmatic status or backup dashboard
Web and Content Services
www.mydomain.com- Redirect to your main domain once WordPress is live (Chapter 11)blog.mydomain.com- Alternate marketing site or staging WordPressdocs.mydomain.com- Docs portal built with BookStack or similar
Monitoring and Analytics
stats.mydomain.com- Matomo analytics (Chapter 12)monitor.mydomain.com- Monitoring stack (Uptime Kuma, Grafana, etc.)status.mydomain.com- Public status page
How to Create Subdomains
The process varies by hosting provider, but the steps are always: point @ and www to your Infinity Tools server, then create matching records for every subdomain Traefik will serve.
Step 1: Get Your Server's IP Address
First, you need to know your server's IP address. You can find this in your server provider's dashboard or by running this command on your server:
curl ifconfig.meThis will show you your server's public IP address (something like 123.456.789.012).
Step 2: Access Your DNS Management
Log into your domain registrar or hosting provider and look for:
- DNS Management
- DNS Settings
- Domain Management
- Name Servers
Provider-Specific Instructions
Below are examples from popular registrars and DNS hosts. Interfaces may change, but the record types stay the same. Each provider follows the same basic pattern:
- Optionally, an A record for
@pointing to your Infinity Tools server IP — this makeshttps://yourdomain.comandhttps://www.yourdomain.comresolve to the server (for example, to host WordPress later).
Skip this step if your main website is hosted elsewhere and you only want to connect specific subdomains. - A CNAME record for
wwwpointing to@. - Individual A records for every service subdomain (e.g.
vault,files,monitor) pointing to your Infinity Tools server IP.
Note: The example IP 203.0.113.42 is for illustration only — replace it with your actual server IP.
Hetzner Cloud
If you manage DNS in Hetzner:
- Log into the Hetzner Cloud Console.
- Go to DNS and select your domain.
- Click Add record → choose A → set Name to
@and Value to your server IP → Save. - Add a CNAME record with Name
wwwpointing to@. - Repeat Add record → A for each service subdomain (e.g.,
vault,files) and set the same server IP.
Example: To prepare WordPress for the main domain and Vaultwarden on vault.myinfinitytools.com:
@→203.0.113.42(A record)www→@(CNAME)vault→203.0.113.42(A record)
Cloudflare
If you proxy traffic through Cloudflare:
- Log into the Cloudflare Dashboard.
- Select your domain and open DNS → Records.
- Click Add record → choose A → set Name to
@, IPv4 address to your server IP, TTL Auto, Proxy status Off (DNS only) while testing → Save. - Add a CNAME record for
wwwpointing to@. - Add individual A records for each service subdomain (e.g.,
files,vault) pointing to the same IP. You can enable the orange-cloud proxy after confirming Traefik and certificates work.
Namecheap
If you registered your domain with Namecheap:
- Log into your Namecheap account.
- Open Domain List → click Manage next to your domain.
- Go to the Advanced DNS tab.
- Under Host Records, click Add New Record → choose A Record → set Host to
@, Value to your server IP, TTL Automatic → Save. - Add a CNAME Record with Host
wwwand Value@. - Add more A Records for each service subdomain (e.g.,
vault,files) pointing to the same IP.
GoDaddy
If you're using GoDaddy DNS:
- Log into your GoDaddy account.
- Open My Products → locate your domain → click DNS.
- Click Add in the Records section, choose A, set Name to
@, Value to your server IP, TTL 1 Hour → Save. - Add a CNAME record with Name
wwwpointing to@. - Add more A records for each service subdomain (Name =
vault,files, etc.; Value = server IP).
Porkbun
If you manage DNS with Porkbun:
- Log into the Porkbun Domain Management panel.
- Click Details next to your domain.
- In Quick DNS Config, click Edit.
- Add an A record with Host
@and Answer = your server IP. - Add a CNAME record with Host
wwwand Answer@. - Add more A records for each service subdomain (Host =
vault,files, etc.; Answer = server IP). - Click Save Changes.
Google Domains / Squarespace Domains
If your domain is managed in Google Domains (now Squarespace):
- Sign in at domains.google.
- Select your domain and open the DNS tab.
- Under Custom records, click + Add record.
- Choose A, set Name to
@, Data to your server IP, TTL to the default → Save. - Add a CNAME with Name
wwwand Data@. - Add more A records for each service subdomain (
vault,files, etc.) pointing to the same IP.
OVHcloud
If you manage DNS at OVH:
- Log into the OVHcloud Manager.
- Go to Domains → select your domain → DNS zone.
- Click Add an entry → choose A → set Sub-domain to
@and Target to your server IP → confirm. - Add another entry: Type CNAME, Sub-domain
www, Targetyourdomain.com.(OVH will append the dot automatically). - Add additional A entries for each service subdomain (
vault,files, etc.) pointing to the same IP.
Understanding DNS Propagation
After creating a subdomain, it takes time for the change to spread across the internet. This is called DNS propagation.
How Long Does It Take?
- Usually: 5-30 minutes
- Sometimes: Up to 24 hours
- Rarely: Up to 48 hours
How to Check if It's Working
You can test if your subdomain is working by visiting it in your browser:
- Go to
https://vault.yourdomain.com - If you see a page (even an error), the subdomain is working
- If you get "This site can't be reached", it's still propagating
Testing with Command Line
You can also test from your server:
# Test if subdomain resolves
nslookup vault.yourdomain.com

# Test if it points to your server
dig vault.yourdomain.com
Create Your Domain Checklist
Before installing applications, map out every DNS record you want in place. This keeps your launch organized and helps you avoid downtime on your main site.
Essential Records
These are the records most beginners configure on day one:
@→ Your Infinity Tools server IP (WordPress will live here later)www→ CNAME pointing to@vault.yourdomain.com→ Your server IP for Vaultwardenfiles.yourdomain.com→ Your server IP for Nextcloud or file storage
Optional Subdomains
Add these after your core services are live:
blog.yourdomain.com→ Alternate blog or marketing siteadmin.yourdomain.com→ Admin panel (use with caution, see security tips)sync.yourdomain.com→ File synchronization endpointstats.yourdomain.com→ Analytics tools like Matomomonitor.yourdomain.com→ Monitoring dashboardsbackup.yourdomain.com→ Backup management interface
Best Practices
Naming Conventions
- ✅ Use descriptive names -
vaultinstead ofapp1 - ✅ Keep them short -
filesinstead offile-storage-system - ✅ Use lowercase -
vaultnotVault - ✅ Avoid special characters - No spaces, symbols, or accents
Security Considerations
- ✅ Don't use obvious names - Avoid
adminfor sensitive services - ✅ Use random names for sensitive services -
a7b9c2instead ofadmin - ✅ Document your subdomains - Keep a list of what each one does
Troubleshooting
Subdomain Not Working
If your subdomain isn't working:
- Check the DNS record - Make sure it points to the right IP
- Wait for propagation - Give it 30 minutes to an hour
- Check for typos - Make sure the subdomain name is correct
- Test with different tools - Try
nslookupor online DNS checkers
Common Mistakes
- ❌ Including the full domain in the host field - Use
vaultnotvault.mydomain.com - ❌ Pointing your main domain to the wrong place - Double-check WordPress instructions before editing
@andwww - ❌ Wrong IP address - Make sure you're using your server's public IP
- ❌ Wrong record type - Use "A" record, not "CNAME" for IP addresses
- ❌ Not saving the record - Make sure to click "Save" after creating
Quick Reference
Find your server IP:
curl ifconfig.meVerify your main domain record:
nslookup yourdomain.comTest subdomain resolution:
nslookup vault.yourdomain.comTest from browser:
https://vault.yourdomain.comTip: Until WordPress or another app is installed you'll likely see Traefik's default page at your main domain. That's expected.
You're Ready!
Now you understand how to prepare both your main domain and subdomains! This knowledge will be essential as you install applications like Vaultwarden, Nextcloud, and connect your WordPress site.
What you learned:
- ✅ How to point your main domain - Aim it at your Infinity Tools server so WordPress is ready to launch
- ✅ What subdomains are - Separate addresses for different services
- ✅ How to plan them - Build a checklist before installing apps
- ✅ How to create DNS records - Step-by-step instructions for popular providers
- ✅ How to test everything - Browser and command-line methods
Next step: Move on to Chapter 3 (Setting Up Your Foundation). Keep this checklist handy—each time you install an app, add or confirm the subdomain you planned.
What You Learned
- Main domain setup - How to point
@andwwwto your Infinity Tools server - Subdomains - Separate addresses for different services on your domain
- DNS Records - How to point each subdomain to your server
- DNS Propagation - How long it takes for changes to take effect
- Testing Methods - How to verify both main and subdomains are working
- Planning - How to organize your services with a checklist
You now have the foundation knowledge needed to set up professional-looking, organized services on your server!
Next: Chapter 3 - Setting Up Your Foundation.